
You notice it while carrying groceries in from the garage. A faint line has opened above a doorway. Or maybe it's a yellow-brown ring on the ceiling over the breakfast area, and you're wondering whether it's old, active, harmless, or the start of a much bigger problem. That's how most ceiling and wall repair starts in Houston. Not with a major renovation plan, but with one small sign that something behind the paint isn't right.
Most homes in this area eventually need some form of wall or ceiling attention because drywall is everywhere. Drywall is used in 96% of U.S. homes, which makes drywall repair the most common kind of wall and ceiling maintenance homeowners deal with over time, according to industry research on drywall repair prevalence. In Houston, heat, humidity, plumbing failures, roof leaks, HVAC condensation, and soil movement all speed that process up.
Located in Houston the primary projects that H-Town would like to undertake are; kitchen remodeling, bathroom remodeling, & whole home remodeling
Table of Contents
- Your Guide to Flawless Ceiling and Wall Repair
- Identifying the Real Problem Behind the Damage
- A Practical Guide to DIY Wall and Ceiling Repairs
- Tackling Ceiling-Specific Challenges
- When a Simple Patch Is Not Enough
- Choosing a Professional for Your Houston Remodel
Your Guide to Flawless Ceiling and Wall Repair
A clean repair starts before the first patch knife comes out. If you skip diagnosis, you usually end up fixing the same spot twice. The paint may look better for a few weeks, but the crack comes back, the stain darkens again, or the wall softens because the underlying issue never got handled.
Quick guide before you touch the damage
Use this as a fast first pass before deciding whether you're doing a simple repair, calling a trade, or folding the work into a bigger remodel.
- Hairline crack with no bulge: Often cosmetic, especially around corners, door frames, and long drywall joints. Watch for movement before patching.
- Brown ceiling stain or bubbled paint: Treat it as moisture-related until proven otherwise. Find the source first.
- Soft drywall or crumbling texture: Cut out the damaged section after the area is dry and the cause is fixed.
- Recurring crack in the same location: That's usually not a mud problem. It can point to movement, framing stress, or repeated moisture.
- Damage in a kitchen or bathroom: Look beyond the surface. Plumbing, ventilation, and old finishes often all tie together in those rooms.
Practical rule: If you can't explain why the damage appeared, you're not ready to repair it yet.
Houston homeowners also need to think about timing. Repairs made during humid weather take longer to dry, texture blending is trickier when the existing finish has absorbed years of moisture, and ceiling stains often trace back to systems that don't fail in an obvious way, like a slow roof leak or sweating HVAC line.
What separates a cosmetic repair from a serious one
Cosmetic damage stays on the surface. A nick from furniture, a small anchor hole, or a shallow dent from a doorknob can usually be repaired with patching compound, sanding, primer, and paint. Those jobs are annoying, but they're straightforward.
Serious damage has clues behind it. The drywall may feel soft. The tape may be lifting. The crack may widen and narrow with the season. The stain may return through fresh paint. In those cases, the wall finish isn't the problem. It's just showing you what's happening underneath.
A lot of homeowners wait too long because they don't want the answer to be expensive. That's understandable, but delay usually makes moisture and structural movement harder to track. It also turns a small drywall repair into trim work, flooring damage, cabinet removal, or mold cleanup.
One more point matters in Houston homes. Ceiling and wall repair often overlaps with larger updates. Once you open a wall in a kitchen, bathroom, or laundry area, you may find aging plumbing, poor venting, damaged insulation, or framing that needs correction before the finish layer goes back on. That's why smart repairs don't focus only on patch quality. They focus on whether the wall will stay sound after the patch is painted.
Identifying the Real Problem Behind the Damage
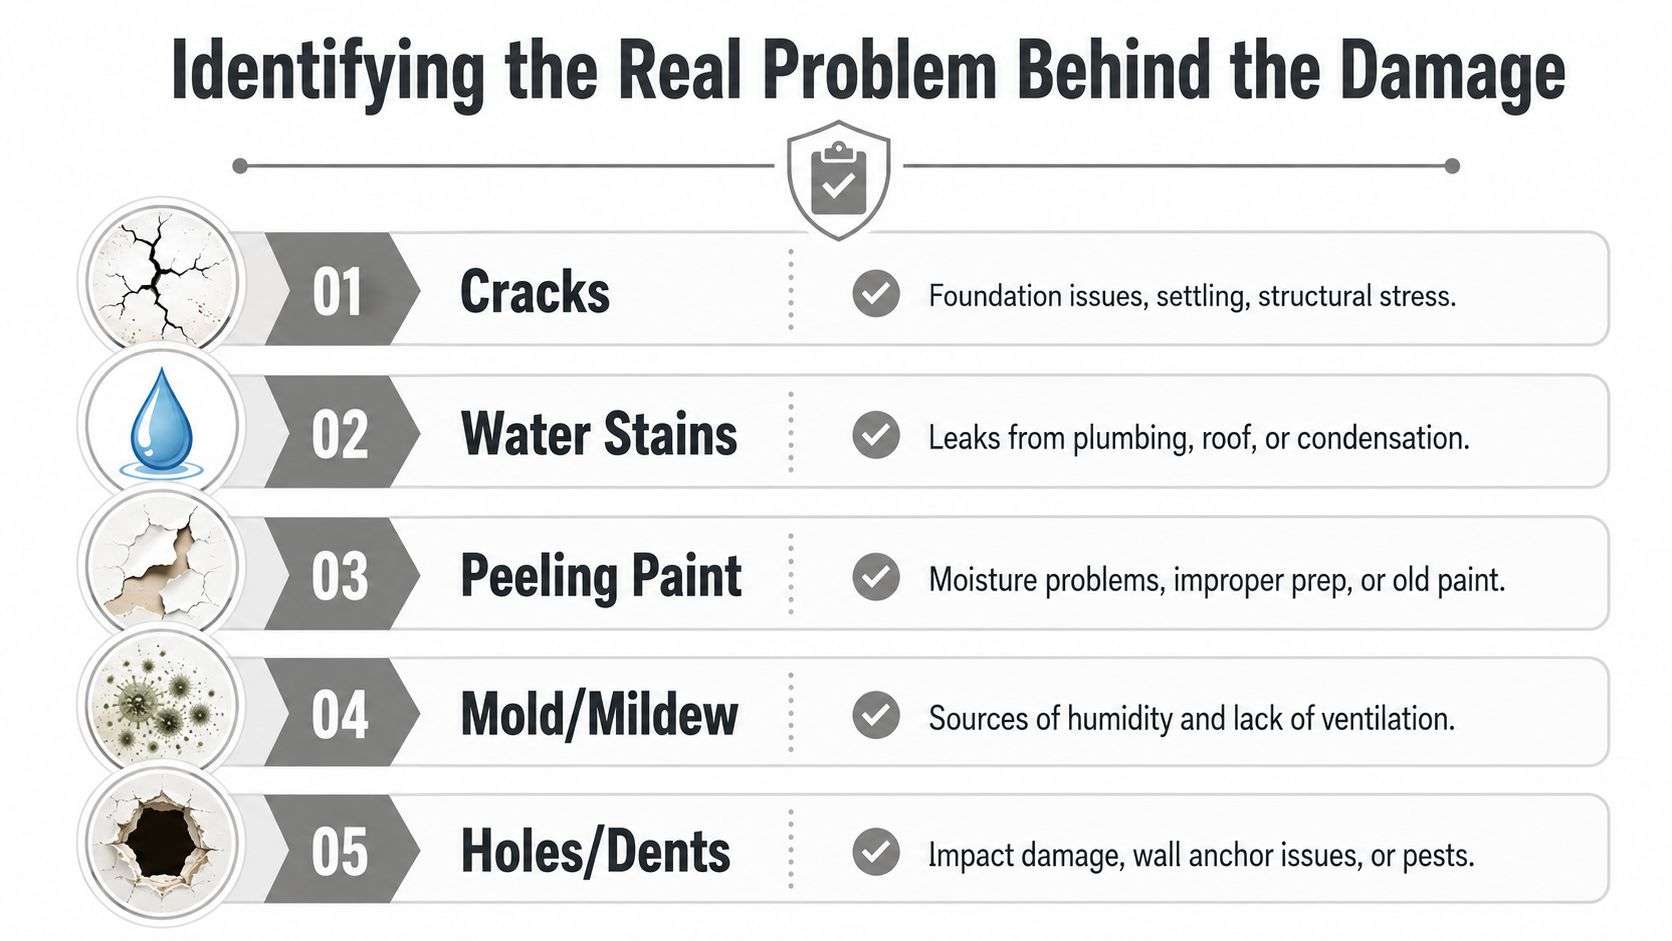
The shape of the damage usually gives away more than the size. A straight seam crack tells a different story than a circular stain. Peeling paint behaves differently from a bulge. If you learn to read those differences, you'll waste a lot less time on false starts.
A simple visual checklist helps narrow things down before anyone cuts, patches, or repaints.
What the pattern usually tells you
Cracks matter, but their location matters more. A thin crack over a door or window can come from seasonal movement, framing stress, or a taped joint that was never finished well. A long crack that keeps reopening after repainting deserves more attention, especially if doors are sticking or trim joints are separating nearby.
Water damage usually leaves a visual trail. Ceiling stains are often ring-shaped or blotchy. Wall damage from a plumbing line may show up lower, especially near tubs, showers, sinks, or refrigerator supply lines. If paint blisters, drywall paper wrinkles, or the area feels cooler or softer than the surrounding wall, stop thinking cosmetic.
Mold and mildew also leave clues, but homeowners often confuse them with dirt or shadowing. In bathrooms and laundry areas, repeated speckling near corners, ceiling edges, or HVAC registers often points to poor ventilation or trapped humidity rather than a single active leak.
If a stain changes shape, expands, or returns after repainting, the water source is still active or the materials never fully dried.
Common Damage Types and Their Telltale Signs
| Damage Source | Visual Cues | Feel/Texture | Urgency |
|---|---|---|---|
| Settling or movement | Straight or diagonal cracks, often at corners and openings | Usually dry and firm | Moderate if stable, higher if recurring |
| Plumbing or roof leak | Yellow, brown, or dark stain; bubbling paint; sagging texture | Damp, soft, swollen, or crumbly | High |
| Humidity and condensation | Peeling paint, mildew spotting, repeated discoloration | Can feel tacky or chalky | Moderate to high |
| Impact or fastener failure | Dents, punctures, popped screw or nail heads | Localized damage, firm around edges | Low to moderate |
| Previous poor repair | Flashing patches, ridges, uneven seams, recurring joint lines | Hard but visibly uneven | Low, unless tied to movement or moisture |
For a homeowner trying to sort moisture signals from harmless surface wear, this guide to 8 signs of water damage is a useful cross-check because it focuses on the clues people miss before drywall starts failing outright.
If the damage is near a sink wall, shower chase, island supply line, or upstairs bath, I'd look at plumbing before touching finish materials. A targeted plumbing inspection in Houston is often the difference between one repair and three repeat repairs.
Houston conditions that change the diagnosis
Houston homes deal with two local realities all the time. Moisture hangs around longer, and soil movement changes how drywall behaves. Both can make ordinary-looking damage more complicated.
Clay-heavy soil movement can telegraph through the house as stair-step cracking at transitions, recurring corner separation, and ceiling joint lines that seem to reappear no matter how many times they're mudded. That doesn't always mean major structural failure, but it does mean surface repairs alone may not hold.
Humidity changes how materials dry and how paint adheres. A patched area that gets primed too early may flash, blister, or show a different sheen. In bathrooms and kitchens, underpowered venting often causes repeated paint failure on ceilings even when there isn't a leak at all.
Permits also matter once diagnosis moves past cosmetic work. Replacing drywall doesn't usually trigger concern by itself, but once the repair reveals electrical relocation, plumbing changes, framing correction, or larger rebuild work, code compliance enters the picture. Homeowners often think they're authorizing a patch and end up needing coordinated repair across several trades.
A Practical Guide to DIY Wall and Ceiling Repairs
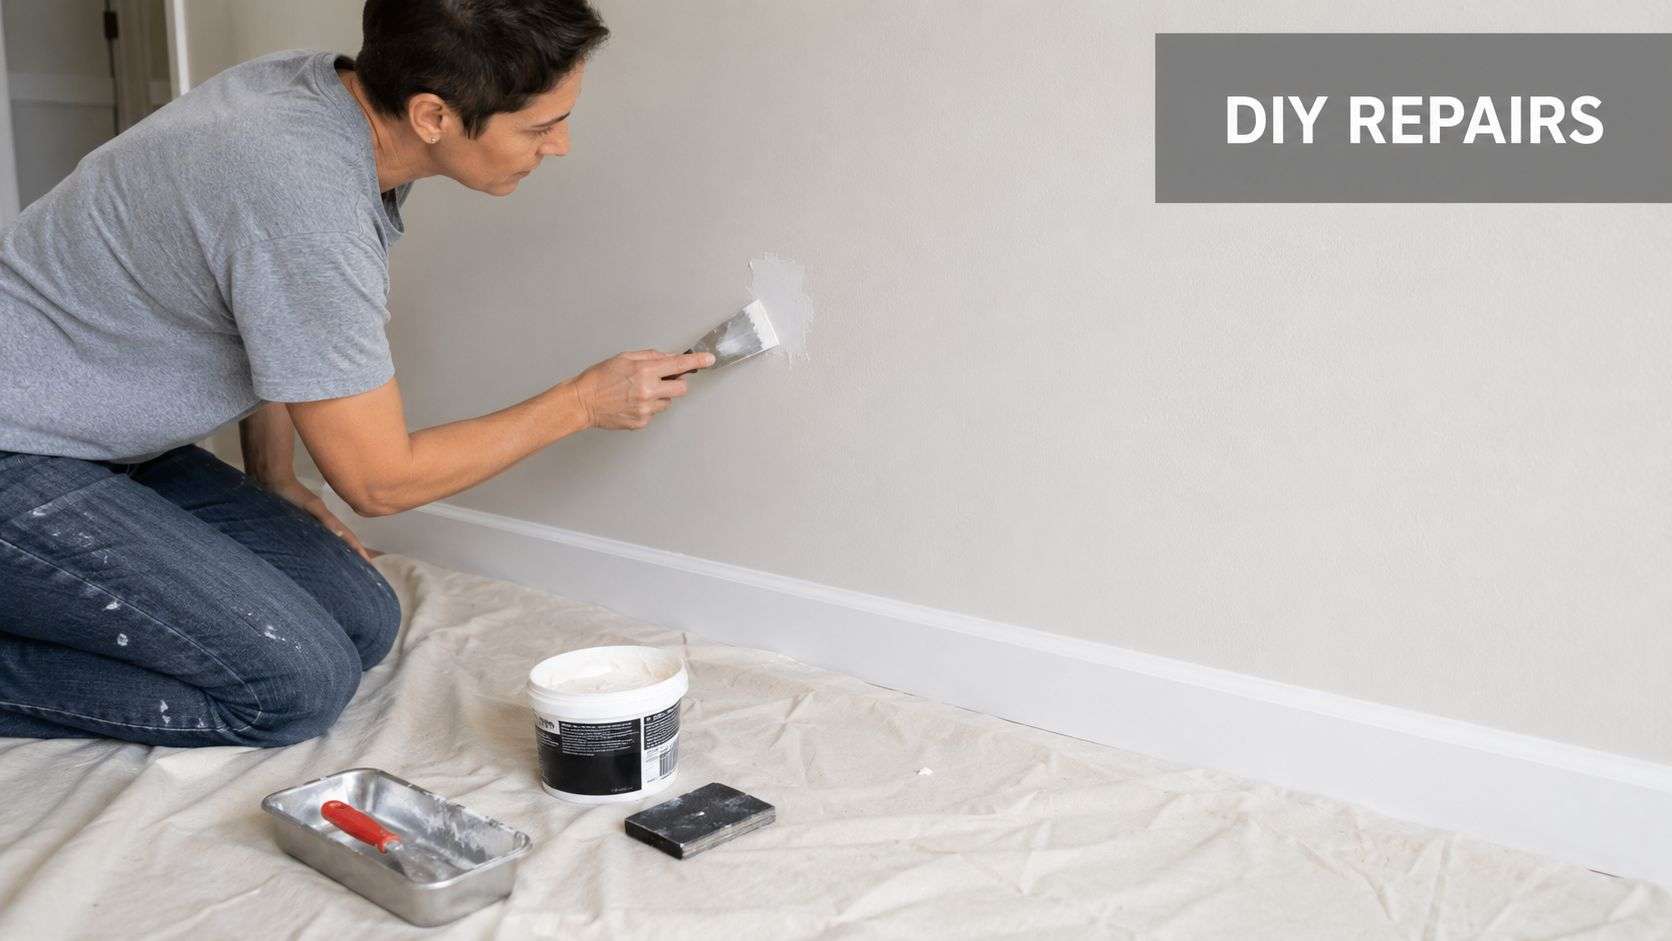
Some repairs are worth doing yourself. If the damage is dry, limited, and clearly cosmetic, a homeowner with patience can get a strong result. The key is using the right material for the problem instead of trying to force one product to handle every defect.
This is the part often rushed: filling too much at once, skipping sanding between coats, or painting over unprimed compound. That's why a patch looks obvious even when the hole is technically gone.
Small holes and dents
Nail holes, picture hanger marks, shallow dings, and minor dents are the easiest category. Clean the area first. If the drywall paper is fuzzy or lifted, trim the loose fibers with a utility knife so you're not mudding over torn material.
Then fill in thin passes, not one deep blob.
- Use lightweight patching compound for tiny holes: It sands easily and works well for paint-ready touchups.
- Switch to setting-type compound for deeper chips: It hardens faster and shrinks less, which helps on damaged corners or repeated repairs.
- Feather wider than the damage itself: A patch disappears because the edges taper out, not because the center is perfectly filled.
Let each coat dry fully before sanding. Sand with a light touch and check the patch from the side, not just straight on. Side light shows ridges immediately.
Cracks that need tape not just mud
A drywall crack that has opened through the finish needs reinforcement. Smearing compound over it without tape almost never lasts. The crack line may hide for a short time, but it usually prints back through.
Open the crack slightly with a utility knife so loose material is removed. Then embed drywall tape in fresh compound and cover it with a tight first coat. After that sets, add wider finish coats to taper the repair into the surrounding wall.
Don't build the repair in the center. Build it outward. That's how you avoid a hump.
For recurring cracks, pay attention to what the crack is doing before you patch it. If it keeps coming back in the same place, the issue may be movement or loose board edges rather than failed finish. In water-related situations, use a repair approach that starts with drying and cause correction. This walkthrough on how to fix water-damaged walls is the right path when the drywall damage isn't purely cosmetic.
Nail pops and texture matching
A nail pop or screw pop looks minor, but it needs a little more than mud. The fastener has lost its hold well enough to push against the finish surface. Pressing the bump back in and filling over it won't solve much.
Instead, secure the drywall again with a new drywall screw into framing near the popped fastener. Then remove or set the loose fastener deeper, skim the area, sand, prime, and repaint.
Texture matching is where many DIY repairs start looking amateur. The patch itself may be flat and solid, but the surrounding wall or ceiling has orange peel, knockdown, or hand-applied texture that catches light differently.
A few rules help:
- Practice on scrap first: Texture is easier to control when you test distance, thickness, and drying time before spraying or stippling the wall.
- Match the scale, not just the type: Fine orange peel and heavy orange peel are not the same finish.
- Blend beyond the patch perimeter: Hard edges make even a good texture stand out.
- Prime before final paint: Raw compound absorbs paint differently, which exaggerates patch outlines.
If the wall was repaired before and has several overlapping finishes, perfect blending may not be realistic without repainting the full plane from corner to corner. That's common in living rooms, hallways, and long kitchen walls where side lighting makes every seam visible.
DIY ceiling work also deserves honesty. Working overhead is slower, messier, and harder to finish cleanly. If you're repairing more than a very small isolated area, your neck, shoulders, and patience will all notice.
Tackling Ceiling-Specific Challenges
Ceilings fail differently because gravity works against every step of the repair. Mud sags. Tape loosens if it isn't bedded well. Water spreads wider above the face paper before it finally shows itself. That's why a repair method that works on a wall often gives a mediocre result overhead.
Sagging drywall overhead
A ceiling that looks bowed, wavy, or slightly dropped between framing members needs to be checked before anyone skims over it. In Houston, prolonged humidity and moisture exposure can weaken drywall board, soften paper, and reduce fastener holding strength.
If the drywall is still sound, you may be able to re-secure it to framing with new screws placed carefully into joists. The goal is to pull the board back tight without breaking the face paper apart. If the panel is soft, crumbling, or visibly deformed, replacement is usually cleaner than trying to force it flat.
Safety matters here. Shut off power in the work area if there are recessed lights, fans, or nearby fixtures. Wear eye protection, cover the room, and don't work directly under a section that feels unstable.
Stains that bleed back through paint
A ceiling stain isn't repaired with paint alone. First, the source has to be corrected. After that, the material has to dry fully. Then you decide whether you're sealing, patching, or cutting out.
For a dry stain with no soft drywall, scrape anything loose, sand lightly, and use a stain-blocking primer before finish paint. Without that sealer, tannins and discoloration often bleed straight back through.
If the stain is paired with bubbling tape, sagging texture, or a soft area, don't trap damaged material in place. Cut back to sound drywall, repair the opening properly, and then prime and paint the repaired section and often the broader ceiling plane for a consistent sheen.
A stain that's old but dry can still leave weak paper and failed bond underneath. Check the surface with your hand, not just your eyes.
Popcorn and patched textures
Popcorn ceilings create their own headaches. Small spot repairs can work, but the patched area often looks denser or fresher than the surrounding field. Age, paint buildup, and sunlight change ceiling texture over time, so matching the original exactly can be difficult.
If you're patching a small damaged area, keep the edges neat and test the texture pattern before applying it overhead. Don't overwork it. Popcorn and sprayed textures get ugly fast when they're touched repeatedly during drying.
For full removal, homeowners need to think past appearance. Texture removal is dusty, disruptive, and often connected to broader updates like lighting changes, ceiling flattening, insulation work, or whole-room repainting. In older homes, any disturbance of existing finishes should be approached carefully, especially before aggressive scraping or demolition.
Ceiling repairs also expose hidden permit questions sooner than wall repairs do. If the stain came from an upstairs bath, a roof penetration, or an HVAC issue, the finish repair may only be the visible part of a code-related correction. That's where a contractor earns their keep by coordinating the source repair with the finish work instead of treating them as separate problems.
When a Simple Patch Is Not Enough
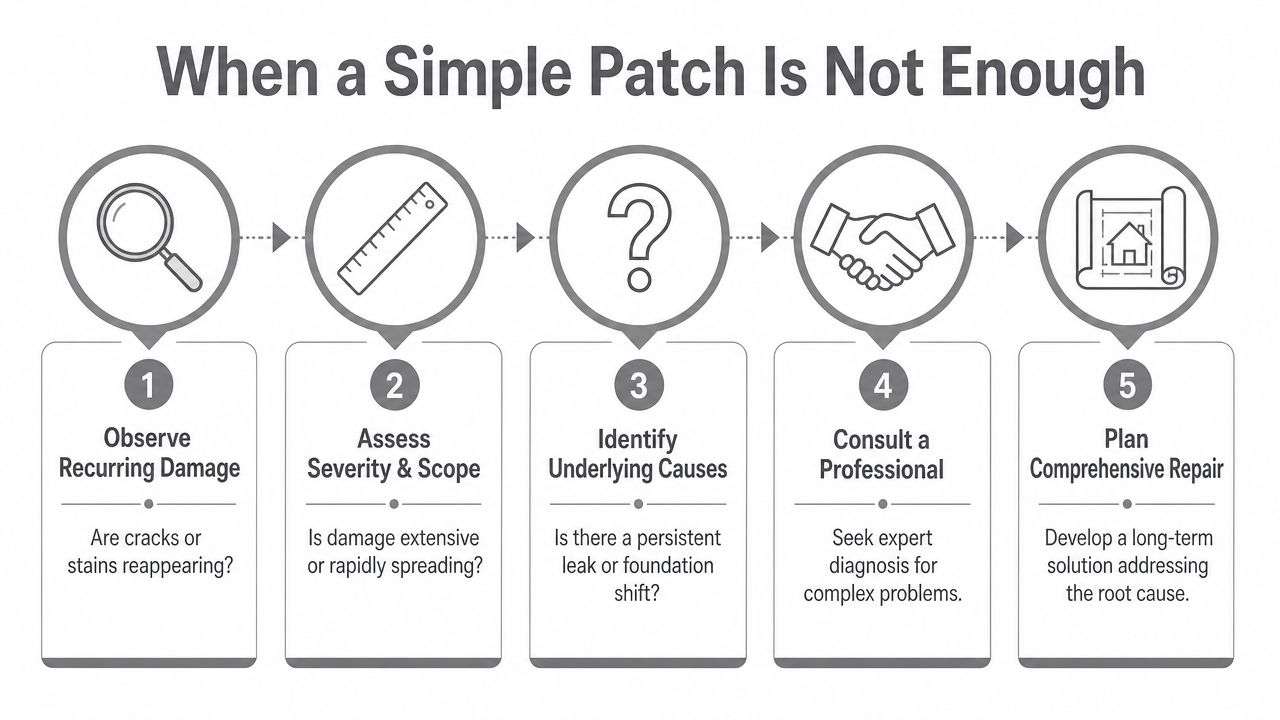
A house will tell you when you're in patch mode and when you're in project mode. Homeowners usually know it before they admit it. The same crack keeps reopening. The same bathroom ceiling keeps peeling. The same kitchen wall keeps getting opened for plumbing access. At that point, doing another isolated repair may cost less today, but it often costs more over time.
Repeating damage means the repair strategy is wrong
Recurring damage usually points to one of four conditions. Ongoing moisture, unresolved movement, failed prior workmanship, or an outdated room assembly that needs more than surface correction.
Here's when I'd stop thinking “patch” and start thinking “plan”:
- The damage comes back in the same place: That's common with joint movement, roof leaks, plumbing leaks, and bad previous repairs.
- Multiple surfaces are involved: If the ceiling, wall, trim, and flooring are all showing signs, the problem has moved beyond drywall.
- The affected room is service-heavy: Kitchens, bathrooms, and laundry rooms hide plumbing, venting, and electrical issues inside what first looks like surface damage.
- Access is already required: Once cabinets, tile, or fixtures have to move, the economics change. It often makes sense to improve the room while it's open.
Sometimes the smartest move is not a prettier repair. It's using the necessary repair as the starting point for a more durable redesign.
Why repairs often belong inside a remodel plan
This is especially true in kitchens and bathrooms. If wall damage sits behind old cabinets, around shower assemblies, near vent stacks, or under outdated lighting and exhaust layouts, a one-spot repair can become wasteful. You pay to patch around conditions that are going to be changed anyway.
In Houston, that conversation happens a lot in kitchens because wall and ceiling work rarely stays isolated for long. The typical cost for a kitchen remodel in Houston ranges from $19,500 to $75,000, with budget remodels averaging around $30,000 and mid-range projects targeting $50,000 to $75,000, according to this Houston kitchen remodel cost guide. That makes a kitchen a significant project, but also a practical place to integrate drywall repair, plumbing access, venting upgrades, and finish correction at the same time.
If you're already opening a wall for a leak repair behind a sink run, that may be the right moment to rethink cabinet layout, backsplash condition, lighting placement, and old drywall that has been patched repeatedly. The same logic applies in bathrooms where repeated ceiling staining may trace back to poor ventilation or plumbing hidden in a wet wall.
One straightforward option for homeowners who want repair and remodeling handled under one roof is H-Towne & Around Remodelers, Inc., which works on residential remodeling and restoration projects in the Houston area. The value in that kind of setup isn't hype. It's coordination. One team can assess whether the damaged finish belongs in a localized repair, a room remodel, or a broader home update.
When storm, fire, or flood damage is involved, the decision gets easier. You're not choosing between patch and remodel based on preference alone. You're deciding how to rebuild the room correctly so the finished work isn't sitting on compromised structure, wet insulation, or outdated systems.
Choosing a Professional for Your Houston Remodel
When the work moves beyond cosmetic repair, the contractor matters as much as the scope. A good finish crew can make damage disappear. A good remodeler does more than that. They find out why the damage happened, bring in the right trades, deal with permits when needed, and rebuild in the right sequence.
That distinction is easy to miss when you're staring at a stain and just want the ceiling painted. But once plumbing, framing, electrical, ventilation, or insurance-related restoration enters the picture, cheap and fast usually creates follow-up work.

What to verify before anyone opens a wall
Start with the basics. The company should be insured, experienced in occupied residential work, and able to explain how it handles protection, dust control, scheduling, and change conditions uncovered after demolition.
Then get more specific.
- Ask who diagnoses the cause: You want more than a painter who says they can cover the spot.
- Ask how they handle Houston permitting: If the work expands into plumbing, electrical, or structural correction, that answer needs to be clear.
- Ask about trade coordination: Ceiling and wall repair often touches more than drywall. Good outcomes depend on sequencing.
- Ask what happens if hidden damage is uncovered: Wet insulation, damaged framing, and outdated venting should not become improvised surprises.
The right contractor doesn't rush to price the patch before understanding the failure.
A local restoration background also matters. Homes in this region take hits from storms, wind-driven rain, roof failures, and interior flooding. If your damage is tied to a severe event, it helps to talk with a team experienced in storm damage restoration in Houston so the repair scope reflects the whole condition, not just the visible drywall.
What good project planning looks like
A well-run project usually feels calm, even when the work is substantial. Measurements are documented. Moisture or movement concerns are explained in plain language. The contract separates allowances from fixed work. Materials, prep, access, cleanup, and finish expectations are discussed before demo starts.
For larger room updates, planning also means deciding what to improve while the walls are already open. In many homes, the repair itself is only part of the opportunity. Kitchen remodeling, bathroom remodeling, and whole home remodeling often solve the conditions that caused the damage in the first place.
That's the practical lens homeowners should use. Don't hire only for patch skill. Hire for judgment. The best value often comes from a contractor who can tell you when a repair is enough, when it isn't, and how to rebuild the area so you're not chasing the same crack or stain next season.
If your home has ceiling stains, recurring drywall cracks, moisture-damaged walls, or repair work that's starting to point toward a bigger kitchen, bathroom, or whole-home project, talk with H-Towne & Around Remodelers, Inc.. They serve Houston-area homeowners with licensed, insured remodeling and restoration work, and they can help determine whether your next step is a focused repair or a broader rebuild plan.